Oh what a mess he made. I wish I had gotten a photo, because it wasn't a very impressive job. Single wires were sheathed in 1"
diameter corrugated *orange* tubing. All the extra wiring that was no longer need was taped out of the way using *duct tape*
Lots of stuff was basically just put where it could fit, with little regard to aesthetics. If I can find a photo of my engine
bay prior to this project, I'll try to put it up.
Well, anyways...
Problem
The fuel injected engine gets something around 15/18 mpg city/hwy. This is with the 3.351 (3.331? 3.35? I don't remember
the exact number) rear differential, and 195/50-R15 tires. Even with these changes, this is a far cry from the spec 25/35 mpg.
Background
Timing's good, spark is good, fuel is good. Something leaks onto the exhaust manifold and burns away quite regularly.
I've replaced the gaskets above the manifold (basically the gaskets associated with the cams and cam shrouds), so it's not leaking
out of there. My next thought is...something wrong with the cylinder head? Cracked or...? I don't know. I can't figure it out,
so I figure what the hey, might as well pull the cylinder head.
Solution?!
Well, I pull it and immediately I notice the bolts for the exhaust manifold are loose. Most are only finger tight, and some are actually halfway
down the stud. Not good. So I figure that's probably the issue. My guess is that it's sucking air in through the non-sealed manifold
and causing the O2 sensor to think it's running lean. It richens up the mixture and puts too much gas through. This is backed up by
the 1-2mm thick layer of carbon on my pistons and combustion chamber. Problem might be solved, but while I've got the cylinder head out
I might as well spruce things up a bit in the engine bay.
Making an Ugly Fiat Engine Bay look nice.
Step 1
Get the cylinder head off to the machine shop to redo valve seats, seals, etc. and a good bead-blasting and cleaning of the ports.
Cram-McCall is a great machine shop, and charges a flat rate of $60.00 for all this work (the bead-blasting is free). Good guys there.
Step 2
Get sidetracked by the poor excuse for a bracket holding up the airflow meter and air filter box. This was a 3-sided, .050" bracket.
Very flimsy, and no structural support. I had to keep the filter box in place with chicken wire hooked thru some holes in the body panel.
I found a 1" wide, 4 foot long, .050" thick 5051 aluminum (the bendable aluminum) in the scrap bin at work. I machined this into
a very nice square bracket that supports the box very well. I also found a 14" x 14" sheet of stainless in the same spot..this made a nice
bottom plate to go along with the bracket. The only movement now is what is found in the stock F.I. Fiats...namely the flex between
the top and bottom sections of the filter box due to the spring clips.
Step 3
Get sidetracked AGAIN making the passenger side engine bay panel look nice. This panel must have come from a different car
that burned up or had sat out a while. The paint (what little was left of it) was in horrible shape, and the wiring wasn't thoughtfully
placed anywhere. This last was partly my fault. I had put headlight relays in and placed them somewhere above and between the radiator
overflow bottle and the coil. Surprisingly, once you take the coil, air filter box, and overflow bottle out, there is very little left
on that side of the engine bay. I cleaned that whole side with brake parts cleaner (basically toluene/acetone mixture..great stuff),
Covered everything else with spare painter's, uh..keep-the-paint-off-your-carpet sheets, and sprayed a med gray primer and DupliColor
Cherry Red. It ended up being a little more orange (or, the original car paint was slightly more magenta), but that's ok. Big
improvement. I redid the wiring and secured it with a healthy supply of little wiring clamps (from Home Depot), including placement
of the headlight relays below the overflow bottle / coil area. Cleaned everything up the best I could, and put the rest of the stuff on
panel. The overflow bottle didn't have a bracket/strap to hold it in place, but it does now.
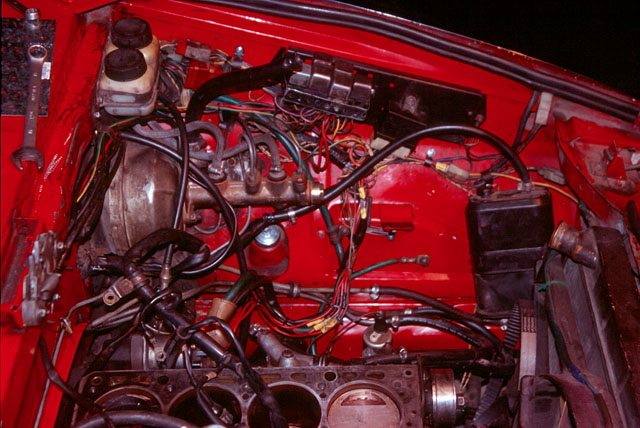
Hey look! Pictures finally!

Passenger side of engine compartment, showing repainted panel, electrical routing,
strap for overflow bottle, and part of the air box bracket.
Note the cylinder head is still off

Close-up showing the filter box and the plate that I made for it to sit in. The plate bends up on both this side and the other side.
You can kind of make out that I cut this tab and bent it down where the air intake goes into the filter box behind the
thermostat. Or maybe you can't make it out. There's a very tall threaded rod that bolts to this plate and then to the front bolt
hole of the filter box. The square bracket I mentioned bolts towards the back of the plate and then to the two rear bolt holes.
You can't see the bracket, though. It was pretty sweet.

Close-up showing the relays (black squares) and circuit breakers (gold-colored) secured to the body panel. The circuit breakers are
kind of cool because if they trip, then you just turn off the headlights and turn them back on. Got them at Kragen Auto Parts.
These are located below the radiator overflow bottle. In fact, that clear plastic tubing is the overflow hose that goes up into the
bottle. Only thing available at the time, and it works pretty good. Lets me see my coolant. That first clamp on the hose that
you see later leaked and had to be replaced with one that worked. Anyways, the wiring for the lamp relays looks pretty complicated,
but it's really not. Other points of interest:
The black plastic wire clamps and sheet metal screws that I used throughout to secure wiring, hoses, etc. Handy little suckers from
Home Depot. The DupliColor spray paint for the redneck in all of us. Back inside corner of the stainless steel air box plate.
Step 4
Repeat for the driver side. This was the real mess. The previous owner who installed the engine had left the original wiring
intact, as though he may wish to downgrade back to the original 1.8L engine. Yeah... Anyways, I pulled all the stuff off this
side, trimmed unnecessary wiring (the wires to the fuel pump and to the coil were about 6 feet too long), cleaned up the body
panel with acetone (works wonders), and put everything back in a pleasing, well-thought out manner.
More pictures!
Shot of the driver side after clean-up. That area just about in the center of the picture was a morass of orange corrugated
tubing, duct tape, massive amounts of wire, and grime. You couldn't see any red at all and the wiring was a complete
nightmare. On the left under the wrench you can see the construction bracket (as in for 2x4s) that I keep many copies of around the garage.
These things are great for making all sorts of thin metal type things. The bracket part of the overflow bottle strap and bracket
was made out of one of these.

Here's a detail of an area that was a pain in the butt to clean. I got it, though. See that grimy area around the brake pressure sensor
below the wiring? That's how grimy the rest of this side of the engine bay was. Acetone cleaned it up pretty good (not that I recommend
acetone unless you know how to handle it).